CrateDB on Amazon EC2
Introduction
When running CrateDB in a cloud environment such as Amazon EC2 (Elastic Compute Cloud) you usually face the problem that CrateDB’s default discovery mechanism does not work out of the box.
Luckily, CrateDB has several built-in mechanisms for unicast host discovery, also one for EC2. EC2 discovery uses the EC2 API to look up other EC2 hosts that are then used as unicast hosts for node discovery (see Unicast Host Discovery).
Note
Note that this best practice only describes how to use the EC2 discovery and its settings, and not how to set up a cluster on EC2 securely.
Basic Configuration
The most important step for EC2 discovery is that you have to launch your EC2
instances within the same security group. The rules of that security group must
at least allow traffic on CrateDB’s transport port (default 4300). This
will allow CrateDB to accept and respond to pings from other CrateDB instances
with the same cluster name and form a cluster.
Once you have your instances running and CrateDB installed, you can enable EC2 discovery:
CrateDB Version |
Reference |
Configuration Example |
|---|---|---|
>=4.x |
discovery.seed_providers: ec2
|
|
<=3.x |
discovery.zen.hosts_provider: ec2
|
To be able to use the EC2 API, CrateDB must sign the requests by using AWS credentials consisting of an access key and a secret key. Therefore AWS provides IAM roles to avoid any distribution of your AWS credentials to the instances.
CrateDB binds to the loopback interface by default. To get EC2 discovery working, you need to update the host setting, in order to bind to and publish the site-local address:
network.host: _site_
Authentication
For that, it is recommended to create a separate user that has only the necessary permissions to describe instances. First, you need to create an IAM role in order to assign the instances later on. This AWS guide gives you a short description of how you can create a policy via the CLI or AWS management console. An example policy file is attached below and should at least contain these API permissions/actions:
{
  "Statement": [
    {
      "Action": [
        "ec2:DescribeInstances"
      ],
      "Effect": "Allow",
      "Resource": [
        "*"
      ]
    }
  ],
  "Version": "2012-10-17"
}
This policy allows the instances to find each other if they have been assigned to this role on startup.
Note
The same environment variables are used when performing COPY FROM and
COPY TO. This means that if you want to use these statements you’ll have
to extend the permissions of that EC2 user.
You could also provide them as system properties or as settings in the
crate.yml, but the advantage of env variables is that also
COPY FROM/TO statements use the same environment variables.
Note
Note that the env variables need to be provided for the user that runs the
CrateDB process, which is usually the user crate in production.
Now you are ready to start your CrateDB instances and they will discover each other automatically. Use the AWS CLI or the AWS Console to run instances and assign them with an IAM role. Note that all CrateDB instances of the same region will join the cluster as long as their cluster name is equal and they are able to communicate to each other over the transport port.
Production Setup
For a production setup, the best way to filter instances for discovery is via
a security group. This requires that you create a separate security group for
each cluster and allow TCP traffic on transport port 4300 (or other, if set
to a different port) only from within the group.
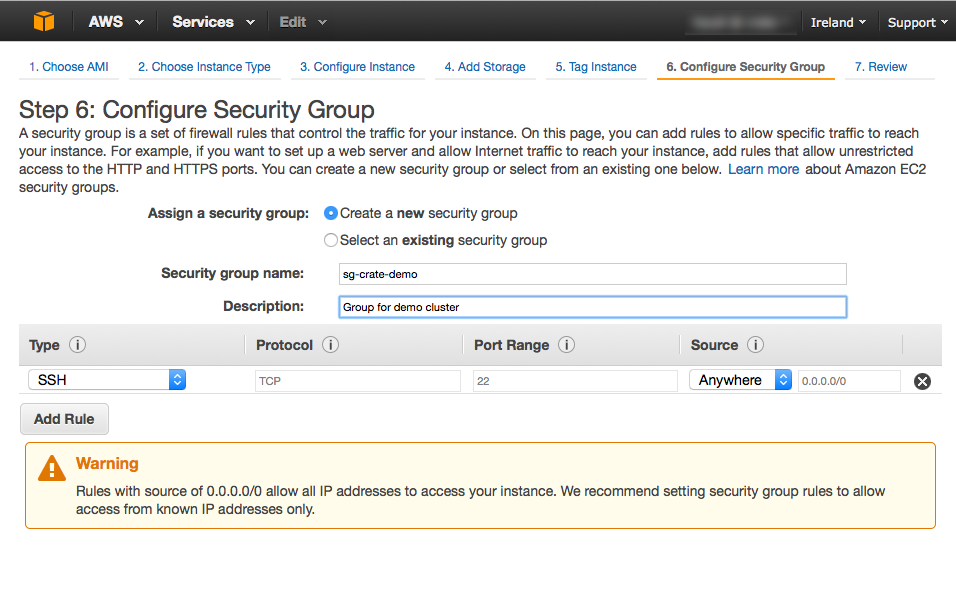
Since the instances that belong to the same CrateDB cluster have the same security group then, you can easily filter instances by that group.
For example, when you launch your instances with the security group
sg-crate-demo, your CrateDB setting would be:
discovery.ec2.groups: sg-crate-demo
The combination with the unique cluster name makes the production setup very simple yet secure.
See also discovery.ec2.groups.
Optional Filters
Sometimes, however, you will want to have a more flexible setup. In this case, there are a few other configuration settings that can be adjusted.
Filter by Tags
The EC2 discovery mechanism can additionally filter machines by instance tags. Tags are key-value pairs that can be assigned to an instance as metadata when it is launched.
A good example usage of tags is to assign environment and usage type information.
Let’s assume you have a pool of several instances tagged with env and
type, where env is either dev or production and type is
either app or database.

Setting discovery.ec2.tag.env to production will filter machines with
the tag key env set to production excluding machines that have set the
same key set to dev (and vice versa).
To further more exclude “app instances” from discovery you can add the
setting discovery.ec2.tag.type: database.
This way, any number of tags can be used for filtering, using the
discovery.ec2.tag. prefix for the setting name.
Filtering by tags can help when you want to launch several CrateDB clusters within the same security group, e.g:
discovery.ec2:
    groups: sg-crate-demo
    tag.env: production
    tag.type: database
See also discovery.ec2.tag.<name>.
Filter by Availability Zones
A third possible way to filter instances is via availability zones. Let’s say
you have several clusters for the same tenant in different availability zones
(e.g. us-west-1 and us-west-2), you can launch the instance with the
same security group (e.g. sg-crate-demo) and filter the instances used for
discovery by availability zone:
discovery.ec2:
    groups: sg-crate-demo
    availability_zones: us-west-1
See also discovery.ec2.availability_zones.