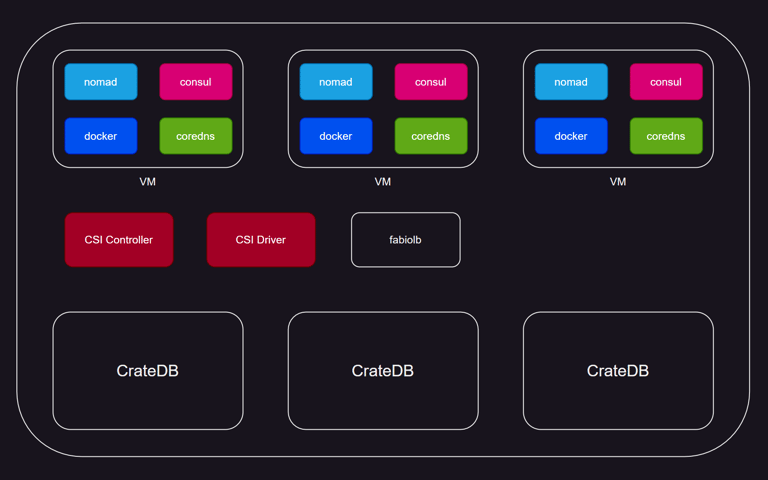
In today's blog post, we introduce a method to deploy CrateDB using Nomad, as opposed to the traditional Kubernetes approach.
Nomad is a flexible workload orchestrator that enables to easily deploy and manage any containerized or legacy application using a single, unified workflow. Nomad can run a diverse workload of Docker, non-containerized, microservice, and batch applications using a declarative infrastructure-as-code approach.
We won't cover the basics too much in this piece, as a lot of getting-started information can be found in Nomad's documentation. Instead, we'd like to cover how we used it to deploy CrateDB and provide a simple way to reproduce it yourself.
Prerequisites
- Some virtual machines (3 in our case, as we wanted to run a 3-node cluster)
- Make sure you can connect to your VMs via SSH, as this is the method Ansible uses.
- Nomad
- Ansible
That's it. We created an Ansible playbook that does most of the work for you. It's available in our cratedb-nomad repository, along with more in-depth instructions. If you only want the Nomad configuration files as a reference, without Ansible, that's available here. The main thing you need to configure is the variables used by Ansible, check those here.
Nomad
Apart from some host configurations, Nomad is the first service that we install. This is the configuration we use:
Notable items:
- Both
serverandclientare enabled, as we're running both server and client on a single machine for simplicity. - Consul service is specified, which is very important for the next steps.
- Nomad can run simple services as simple executables or as docker containers. We install both
dockerandraw_execplugins.
Consul
Consul is a great tool for service discovery, dynamic configuration, health checks, service-to-service communication and more. This is the configuration we use:
One thing to mention with Consul is TLS. It is necessary to generate keys and use TLS encryption in order to run Consul securely. For that, you also need to get Consul locally. Read more in Enable TLS Encryption for Nomad tutorial.
Storage
By default, same as with Kubernetes, the storage is ephemeral, which is not ideal when running a Database.
One option is specifying a volume on your local machine, or a VM and mapping that path to the configuration file. This is okay for small-scale environments. But it has immediate disadvantages, even when using only a couple of VMs, as the docker container always has to start on a machine with the volume that contains your data.
In our deployments, we used CSI (Container Storage Interface) plugins, the same standard that is used by Kubernetes. This allows you to easily create storage space in an environment of your choice (AWS, Azure, Hetzner). This way, you can store important data outside of the application container.
Example configuration can be found in Hetzner's documentation, or in our sample. The CSI plugin is not a part of the Ansible playbook.
CoreDNS
Service discovery is essential for enabling communication in a multi-node CrateDB setup. All CrateDB nodes are registered in Consul, which also serves as the DNS server in our configuration, listening on port 8600 by default. To make CrateDB nodes talk to the DNS server and enable communication with it we can edit the resolved.conf file. We forward anything containing "consul" domain to port 8600, where Consul handles DNS requests. CoreDNS helps with the forwarding part in this setup. This setup ensures effective communication and discovery among CrateDB nodes.
CrateDB
Now for the CrateDB itself. We use the latest docker image of CrateDB and create a three-node cluster in the data center we specified. It also registers the services in Consul, so it's easily manageable and the nodes can talk to each other via CoreDNS.
The actual deployment of CrateDB is not part of the Ansible script to keep it versatile. So this need to be applied as standard Nomad deployment. Code examples can be found here.
Some mentionable settings:
- image = "crate/crate:5.4.0": This line specifies that the Docker image to be used is
- crate/crate with the tag 5.4.0. This determines the version of CrateDB that will be running in the container.
Command-Line Arguments:
The args array contains a list of command-line arguments that will be passed to the CrateDB instance upon startup.
- Ccluster.name=${NOMAD_JOB_NAME}: Cluster name is taken from the job name.
- Cstats.enabled=true: Enables the collection of statistics.
- Cnode.name=${NOMAD_GROUP_NAME}-${NOMAD_ALLOC_INDEX}: Sets the name of the individual CrateDB nodes. The name is derived from the Nomad group name and an allocation index that starts from 0.
- Cdiscovery.type=zen: Specifies that this is not a single-node scenario.
- Cdiscovery.seed_providers=srv
- Cdiscovery.srv.query=disco-${NOMAD_JOB_NAME}.service.${NOMAD_DC}.consul
These are arguments that are important for correct node discovery. They indicate we want to use srv to discover all the nodes, and which query to use:
- Ccluster.initial_master_nodes=${NOMAD_GROUP_NAME}-0: Sets the initial master node for the cluster. In this case, it's the first node.
- Cnode.master=true: Allows the node to be elected as a master, enabling it to control the cluster.
- Cnode.data=true: Allows the node to store data, making it a data node.
- Ctransport.publish_port=${NOMAD_HOST_PORT_disco} and
- Ctransport.tcp.port=${NOMAD_PORT_disco}: Configure the transport layer ports for inter-node communication.
- Cnetwork.publish_host=${NOMAD_IP_http_rest},
- Chttp.port=${NOMAD_PORT_http_rest}, and
- Chttp.publish_port=${NOMAD_HOST_PORT_http_rest}: Configure the HTTP REST interface for client communication.
Conclusion
In this article, we've explored how to deploy CrateDB using Nomad, an alternative to the more commonly used Kubernetes. We've covered prerequisites and configurations needed for both Nomad and Consul when running CrateDB. We also talked about the importance of storage solutions, particularly when deploying a database, and how to address these can be addressed using CSI plugins. We also touched on the importance of service discovery in multi-node scenario. For that, we used CoreDNS service.
We hope this article and the playbook we created help you start with CrateDB if you prefer using Nomad. For further reading and more advanced configurations, you can refer to the official documentation of Nomad and CrateDB.


